Android Outlook Email Account Can't Login Server Config Updated
Mar 21, 2022
Elvinas South. & Nadia
4min Read
How to Ready Up Email on Android
If you're using an Android phone, accessing your emails on the become is like shooting fish in a barrel. Even if you lot have personal and business concern email addresses, it's possible to manage multiple accounts on the same device.
Download Website Launch Checklist
That's because setting upwardly a personal electronic mail account on Gmail, Android's default electronic mail app, is quite simple. However, most business emails use a custom email accost, requiring a manual setup.
In this commodity, we will show you how to set upward Gmail and custom business e-mail addresses on Android devices, so yous tin can easily access and manage your electronic mail accounts from any location.
Set Up Gmail on Android
Android devices require you to log in to a Google Business relationship to use Google's services, including Gmail. That means yous're automatically logged in to your chief Gmail account the moment y'all first ready your device subsequently buying it.
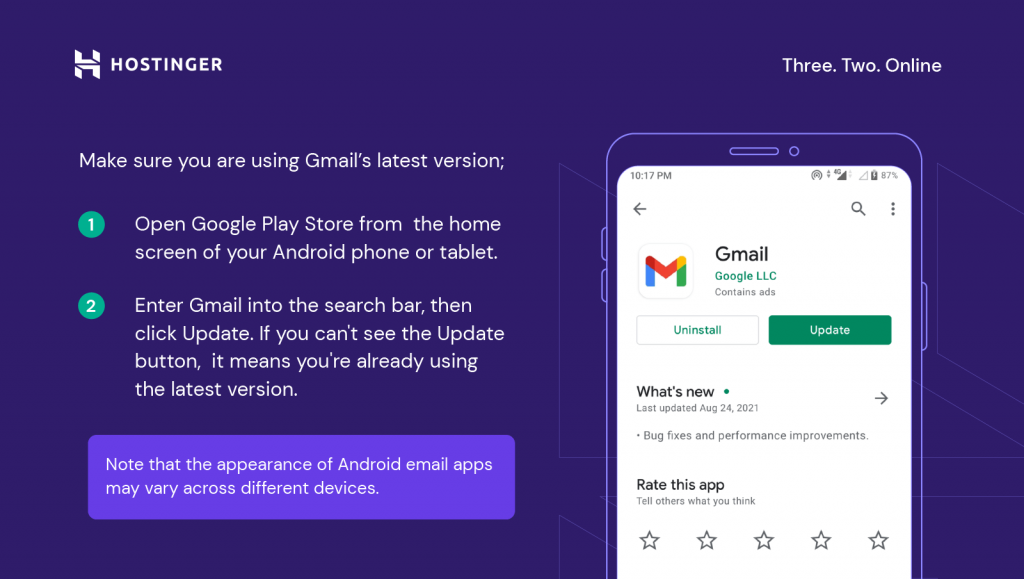
Moreover, it'due south possible to add together a secondary Gmail account on your Android device, similar your side projection'southward email account. However, earlier you proceed to set up another account, make sure y'all are using the app's latest version:
- Open Google Play Store from the home screen of your Android phone or tablet.
- Enter Gmail into the search bar, then click Update. If you can't see the Update button, it means you're already using the latest version.
Note that the advent of Android electronic mail apps may vary across different devices. If you use a device similar Samsung, which has Samsung Postal service every bit its default mail app, these steps volition serve as a full general guide since the process will exist slightly unlike.
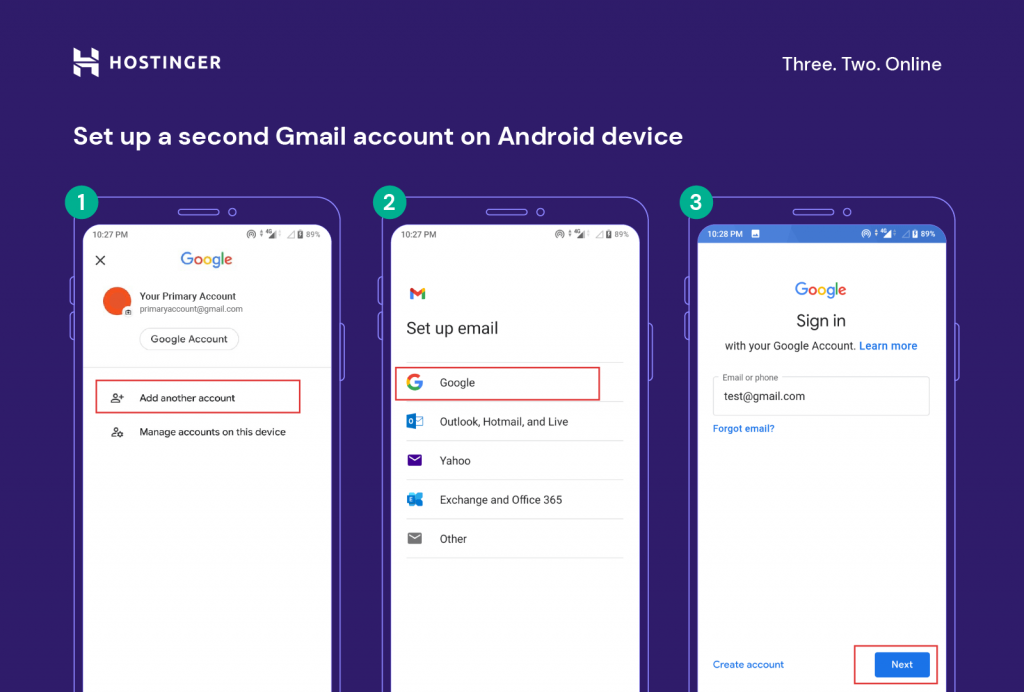
Here are the steps to set up a 2d Gmail account on the aforementioned Android device:
- Open the Gmail app.
- Click the Google Account icon at the tiptop-right corner of the screen, then select Add another account.
- On the Gear up upwardly email screen, select Google.
- Enter your secondary Google business relationship address in the Sign in field and tap Adjacent.
- Enter your password, tap Next again.
- Google will ask if you want to add together a phone number for additional security. We recommend opting in. Tap the Yep, I'm in push.
- You'll encounter the Google Terms of Service screen. Select I Agree.
Now you can manage your primary and secondary Gmail emails from one Android device simultaneously.
It'southward also possible to use Gmail as the main platform to manage all of your business e-mail letters.
Ready Your Business concern Email on Android
Custom email addresses utilise a unique domain proper name instead of generic email provider extensions such every bit Gmail or Outlook. Username@mybusiness.com is an instance – this accost allows people to identify the proper noun of a business or a website easily.
Setting upwardly your business email on Gmail is a convenient solution. Doing information technology means you lot won't have to log in to multiple platforms to manage your personal and business emails. Information technology'due south too costless, and the familiar interface is piece of cake to navigate.
Note that the steps to gear up a business email on an Android device will vary depending on your hosting provider and the type of control panel you utilise. In this article, we volition employ Hostinger's hPanel.
i. Finding Your Email Settings
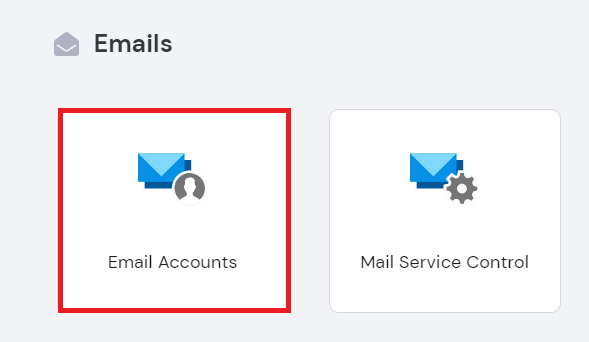
To set up your e-mail on Android, the first thing to exercise is to find the email account details. If your business uses Hostinger'due south email hosting, they will be located on your hPanel dashboard.
- Log in to your Hostinger business relationship. So, navigate to Emails -> Email Accounts.
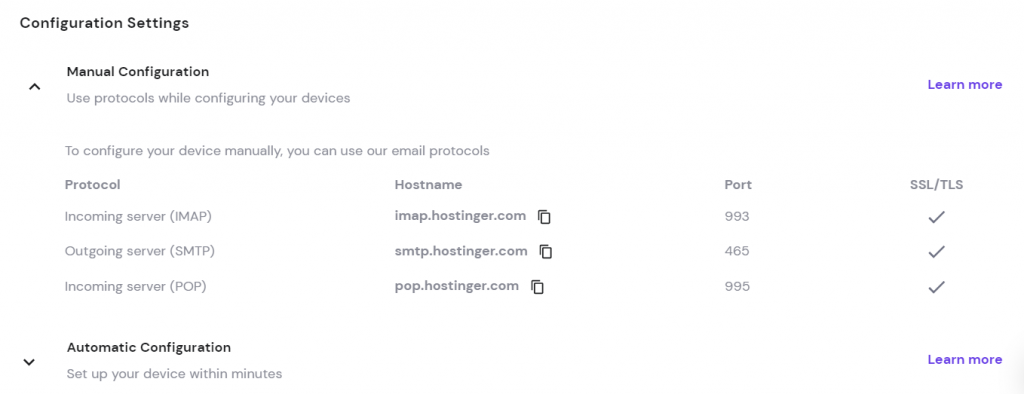
- On the left navigation pane, click Configuration settings.
- In the Configuration Settings section, find the Manual Configuration dropdown carte du jour containing the electronic mail protocols – IMAP, SMTP, and POP. Copy the protocol proper noun, hostname, and port every bit you lot'll need them later.
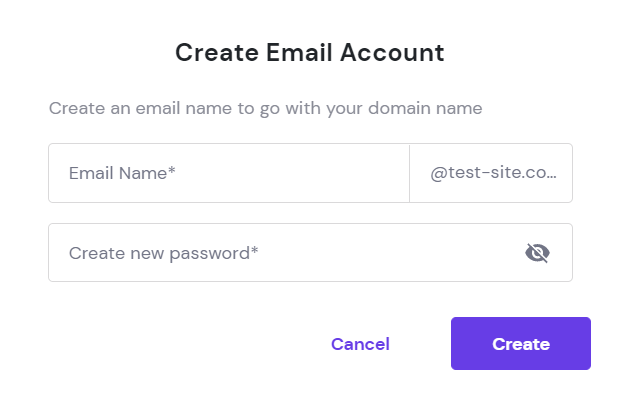
- If you lot don't accept a custom email address notwithstanding, set it upwards past navigating to the Create new e-mail business relationship section and clicking Add email account.
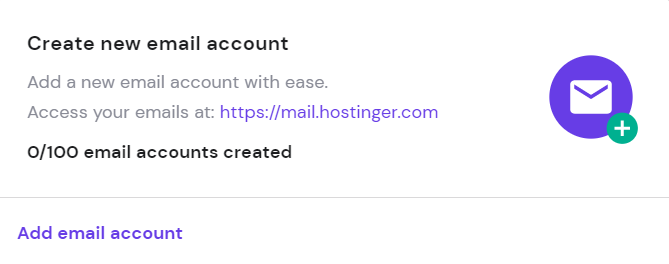
- Create a new email address by entering an email proper noun in the available field. And then, create a password, and click the Create button.
ii. Adding and Setting Upward a New Email Account
Now that yous have the electronic mail configuration details, it's time to ready the email business relationship on your Android device.
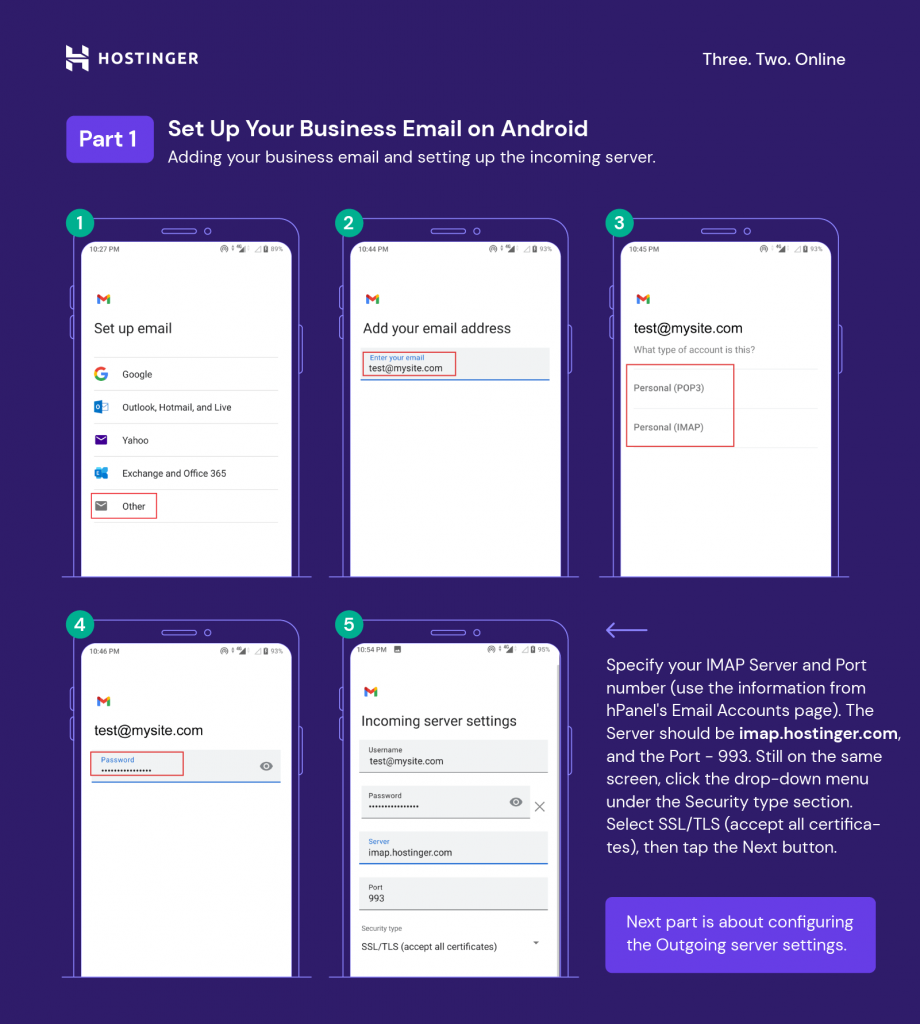
- Open up the Gmail app. Tap the card icon at the upper-left corner of the screen and select Settings.
- On the Settings screen, tap Add account.
- Y'all'll see a Set upwardly email window where you need to choose an email service. Since we're almost to set a custom e-mail, select Other.
- Enter your full email address and tap Manual Setup.
- The app volition inquire what business relationship type your electronic mail is, which means choosing an electronic mail protocol to utilize. We recommend selecting IMAP since it lets you lot synchronize the email inbox beyond multiple devices. To do so, tap Personal (IMAP).
- Fill in the password and tap Side by side.
- Now it's time to configure the Incoming server settings. The Username and Password fields will be automatically filled in with the appropriate details..
- Specify your IMAP Server and Port number – use the information from hPanel'south E-mail Accounts page. The Server should be imap.hostinger.com, and the Port – 993.
- Still on the incoming server settings screen, click the drop-downwards carte du jour under the Security blazon section. Select SSL/TLS (accept all certificates), then tap the Next button.
- Adjacent, configure the Outgoing server settings. Both the Username and Password fields will be automatically filled with your total email address and electronic mail password.
- On the aforementioned approachable server settings screen, enter smtp.hostinger.com into the SMTP Server field. Tap Next.
- On the Account options screen, set up the Sync frequency and whatever additional preferences, such as Sync email for this account. Tap Adjacent.
- Lastly, type in Your name, which is the brandish proper name on messages you lot transport from this account. You lot can also set an Account name, but it'due south non mandatory. Tap Next to cease the process.
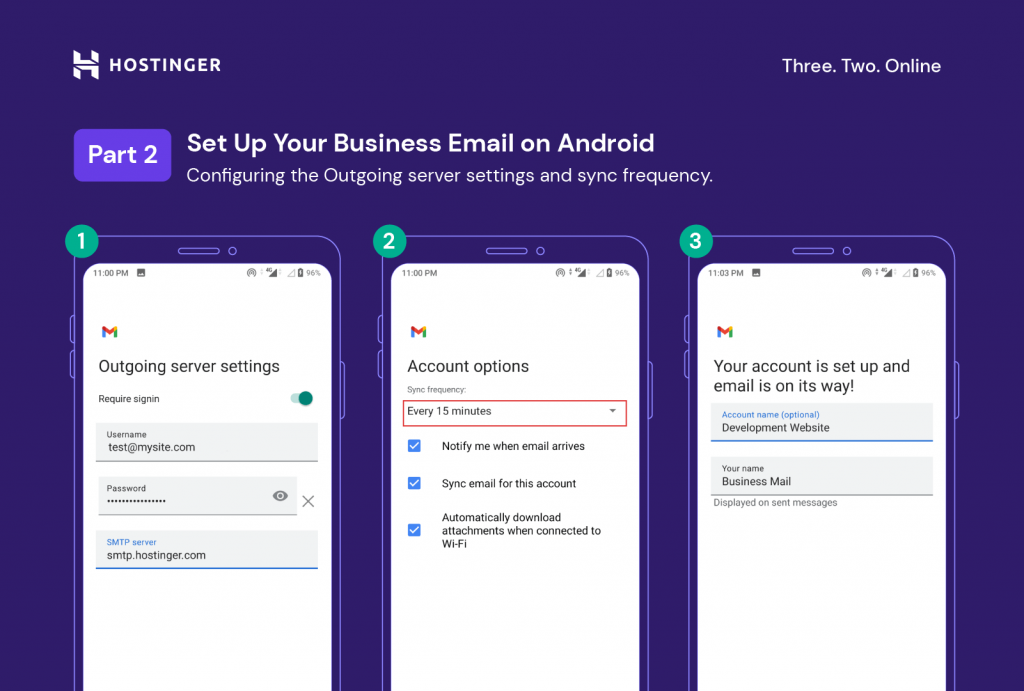
Congratulations – you accept successfully added a custom electronic mail account on your Android device.
Practiced's Note
Some companies use the Microsoft Exchange email server to manage their business emails. It'due south possible to set an Commutation account on an Android device, enabling users to access Exchange ActiveSync, Exchange'south synchronization protocol.
Information technology lets y'all admission your email, calendar, contacts, tasks, and notes from mobile devices, fifty-fifty when offline. Reach out to your IT administrator to know the name of the Exchange server, as this data is necessary for the setup.

Conclusion
Accessing emails on your Android devices while you're on the go is very convenient. You can prepare up multiple emails on your Android phone, which may include personal and business email addresses.
Setting up a personal e-mail is simple, while setting upwardly a business one takes a piddling actress endeavour since you take to do it manually.
However, every bit long every bit you accept all the necessary server configuration details, your business email will be accessible from your Android device in no time.
We hope yous found this article helpful. If y'all have any questions, feel free to get out united states of america a annotate below.

Elvinas is a senior server administrator at Hostinger. He monitors the infrastructure'southward well-being and keeps the uptime at a maximum. Likewise server management, spider web development has always been one of his biggest passions.

Maya is a Digital Content Writer at Hostinger. Equally a website development and digital marketing enthusiast, she's keen to share her knowledge so people tin can thrive online. When she's not writing, you lot tin can discover her watching sci-fi movies while eating ramen.
Android Outlook Email Account Can't Login Server Config Updated
DOWNLOAD HERE
Source: https://www.hostinger.com/tutorials/how-to-setup-email-on-android/
Posted by: crystalwilovents1955.blogspot.com


Comments
Post a Comment